> ## Documentation Index
> Fetch the complete documentation index at: https://documentation.droog.io/llms.txt
> Use this file to discover all available pages before exploring further.
# Create your first assistant
Droog Conversational Assistant allows you to create AI agents tailored to your business needs. In just a few steps, you can set up an assistant that understands your domain and starts answering user questions.
This guide walks you through creating your first assistant.
## Create an assistant in minutes
Your assistant can be ready in just a few minutes. Once created, you can train it with your knowledge and deploy it for users.
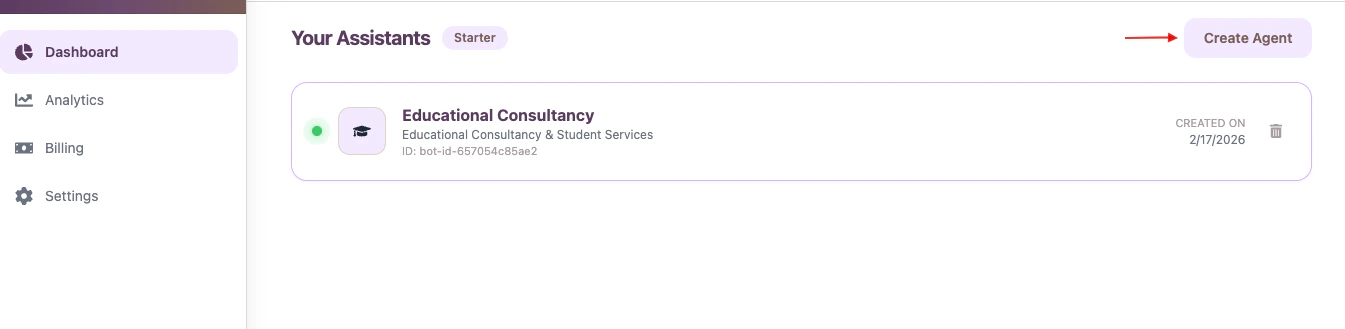
## Step 1 — Open Assistant Dashboard
From your main dashboard, click **Create Agent** to start creating a new assistant.
 ## Step 2 — Create Assistant
Creating an assistant is guided through a simple setup flow. When you click **Create Agent**, Droog opens a wizard that helps configure your assistant’s purpose, personality, and behavior.
Trial accounts can create one assistant with limited features. Upgrade your plan to create multiple assistants and unlock full capabilities.
Follow the steps below:
### 1. Select Industry
Choose the industry or domain that best matches your assistant’s purpose. You can also manually describe your domain if it is not listed.
### 2. Voice and Personality
Select how your assistant should communicate, for example, friendly, professional, or technical. This helps shape how responses sound to your users.
### 3. Core Mission
Define the primary role of the assistant. Examples include:
* Customer support assistant
* Lead capture assistant
* Product guide
* Internal knowledge assistant
This helps the assistant understand what it should focus on.
### 4. Constraints and Additional Rules
You can define rules or guidelines your assistant should follow, such as:
* Follow company best practices
* Avoid discussing competitors
* Redirect billing questions to support
This helps control assistant behaviour.
### 5. Select Avatar (Optional)
You may upload or select an avatar image for your assistant. This helps personalise the assistant experience.
Once complete, click **Create Agent**.
After clicking **Create Agent**, Droog automatically prepares your assistant using the information you provided.
### 6. Upload Knowledge Sources
Your assistant needs knowledge to answer questions accurately.
You can upload documents such as:
* PDF files
* Text files
* Markdown files
* Word documents
You can also import knowledge from websites by adding URLs or sitemap links.
If needed, you can skip this step and upload knowledge later.
When importing content from websites, ensure you have permission to use the content. Always follow ethical and legal guidelines.
### 7. Launch & Activate Assistant
This is the final step of the setup wizard. Review your assistant details and activate it.
Once activated, your assistant becomes available for testing and deployment.
## Assistant Created Successfully
After completion, you will be redirected to the dashboard where your new assistant appears.
Click the assistant to:
* Modify settings
* Add or update knowledge
* Customize responses
* Deploy the assistant
You are now ready to test and deploy your assistant.
## Step 2 — Create Assistant
Creating an assistant is guided through a simple setup flow. When you click **Create Agent**, Droog opens a wizard that helps configure your assistant’s purpose, personality, and behavior.
Trial accounts can create one assistant with limited features. Upgrade your plan to create multiple assistants and unlock full capabilities.
Follow the steps below:
### 1. Select Industry
Choose the industry or domain that best matches your assistant’s purpose. You can also manually describe your domain if it is not listed.
### 2. Voice and Personality
Select how your assistant should communicate, for example, friendly, professional, or technical. This helps shape how responses sound to your users.
### 3. Core Mission
Define the primary role of the assistant. Examples include:
* Customer support assistant
* Lead capture assistant
* Product guide
* Internal knowledge assistant
This helps the assistant understand what it should focus on.
### 4. Constraints and Additional Rules
You can define rules or guidelines your assistant should follow, such as:
* Follow company best practices
* Avoid discussing competitors
* Redirect billing questions to support
This helps control assistant behaviour.
### 5. Select Avatar (Optional)
You may upload or select an avatar image for your assistant. This helps personalise the assistant experience.
Once complete, click **Create Agent**.
After clicking **Create Agent**, Droog automatically prepares your assistant using the information you provided.
### 6. Upload Knowledge Sources
Your assistant needs knowledge to answer questions accurately.
You can upload documents such as:
* PDF files
* Text files
* Markdown files
* Word documents
You can also import knowledge from websites by adding URLs or sitemap links.
If needed, you can skip this step and upload knowledge later.
When importing content from websites, ensure you have permission to use the content. Always follow ethical and legal guidelines.
### 7. Launch & Activate Assistant
This is the final step of the setup wizard. Review your assistant details and activate it.
Once activated, your assistant becomes available for testing and deployment.
## Assistant Created Successfully
After completion, you will be redirected to the dashboard where your new assistant appears.
Click the assistant to:
* Modify settings
* Add or update knowledge
* Customize responses
* Deploy the assistant
You are now ready to test and deploy your assistant.